Luminance Layering
The limited dynamic range
of the two media on which astronomical images are recorded
is not infinite, and in cases of very bright deep sky objects
such as the Orion Nebula or
the Andromeda Galaxy, special techniques must be used to produce
a satisfactory image
on the final print, or computer screen. Film for example may only
contain around 1000
gray shades before saturation occurs, even special films such
as Tech Pan in exotic
developers has less than 10, 000 shades of gray. Scanning films
reduces this range
further, even with the best 36 bit scanners, and even CCDs usually
support a mere 64,000
shades of gray. A severe and final limitation is when trying to
make a print or view the
image on the computer screen. Commonly found 24 bit monitors have
a very limited
palette of 256 shades of gray, and even worse, making a photographic
quality print is less
than 100.
One solution that can be
made to work well for even objects of the most extreme dynamic
range is a technique called Luminosity Layering. The idea is simple,
take half a dozen
images of a deep sky object at different exposures, and combine
them such that all the
information is displayed from all exposures onto one image. You
may first think, why
not use gamma scaling to accomplish this, and in fact for most
CCD images, this works
fine. But to get an extremely deep shot of the outer nebuloisities
of say in galaxies such
as seyfert galaxies, or local group members, we must employ a
different approach. And
quite unlike unsharp masking which removes faint outer nebulosity
and unfortunately
sharpens the background noise in a CCD or grain in a film image,
this method does
neither.
Taking the exposures:
A series of exposures from
the longest possible sky fog limited exposures (or a large
number of CCD integrations) to the shortest that will still reveal
inner nebulosity and
detail is taken. For my M42 example, this was 90 mins with my
12.5" f/5 down to 6 mins
for the shortest. After scanning each image, or converting the
CCD images to tiff format
for input into PhotoShop, the process can begin. Each image is
adjusted separately for
maximum detail and a dark sky background, just like you'd normally
do anyway. You
will find that in the longest exposures, the center of the nebula
or galaxy is burned out, or
fully saturated to 65,000 with a CCD, and the shortest only shows
the inner core, but not
saturated in intensity.
PhotoShop Magic
Each image must be exactly
registered before we can begin. You can use either Maxim
DL align feature, or Picture Window Pro, or Registar to accomplish
this. In PhotoShop,
start with the shortest exposure on the screen first. Next paste
over it the next longer
exposure and so forth until you have a stack with the densest
and most burned out image
at the top. Start on the top layer, and using the selection tools
in PhotoShop such as the
lasso or magic wand tool, select just outside of the burned out
core. Feather the selection
such that it is not a sharp edge, (some experimentation will be
needed here to determine
how much to feather) and hit the delete key. What happens is you
are cutting a hole in
the uppermost layer to make a window to the next most lower image.
Using levels or
brightness, adjust the layer below in brightness to blend perfectly.
(This step is very
important) This process is repeated until we finally get a small
window to the bottom,
least exposed layer.
The final stack is flattened
and saved as an RGB Tiff. Note that if you are doing LRGB
work, this can also be the luminosity layer, since most RGB filtered
images are not
grossly overexposed.
I must stress here that
with the huge dynamic range of CCDs, this method works best
with images in which the maximum exposure is burned out to total
saturation to get the
outermost details. That is quite easy to do with M42!
Example Images
 |
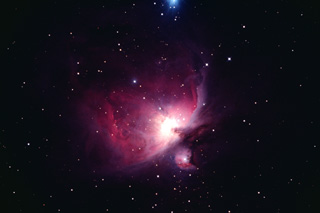 |
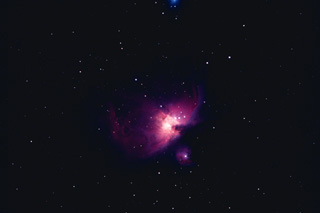
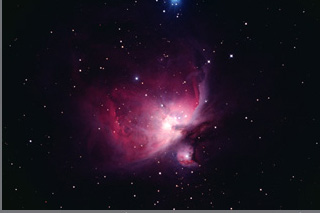
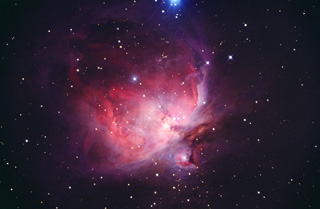
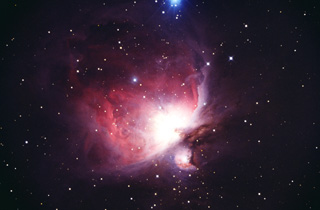 |
Above, three exposures of M42 on Kodak PJ400 - 4mins, 30 mins, and 90 mins.
 |
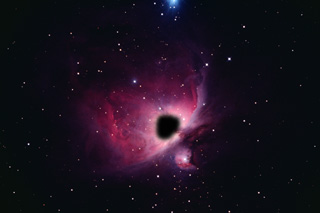 |
|
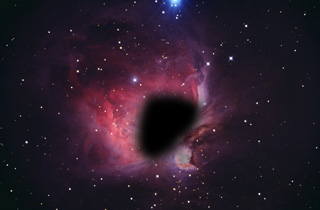
Top, middle and lower layers in Photoshop. ( in practice, a dozen layers may be used) This shows the feathered cutuouts of the burned out regions which will act as a window to the lower layers.
Example of combining the lower and middle layer to form a composite. By adjusting the lower layers contrast and brightness, a match can be achieved.
Previous Uploads:
Three faces of Comet Linear
Comet Linear A2 6-27-01
Van Cittert Deconvolution of the Lunar Highlands
More Northern Lights and the ISS over Payson
The NGC891 Galaxy Group Notes
CCD Shots during Full Moon
Comet Linear July 19 & 25th, 2000
Latest image of Comet Linear S4
Spectacular Red Aurora over Payson Arizona
Fuji's New Formulation of it new Super HQ100
FIRST TESTS OF HYPERED FUJI HQ100
First Schmidt shots with PJ400
First Tricolor shots with 2415
Test Images with Fuji NPH400
First Two Comets with the new CCD Camera