 GeoBot-1
First
Outdoor Autonomous Testing
Updated 12/18/05
GeoBot-1
First
Outdoor Autonomous Testing
Updated 12/18/05

|
After what seemed like forever, we finally
finished our new bumper design for the GeoBot. Many different
prototypes were tried, however it was the dual plunger design
that was able to take a beating on hard rock hits and yet provide
a delicate sense when traversing heavily weeded areas. For this
series of tests, we took the robot to an area with rocks ranging
in size from pea gravel to football sized boulders. The results
indicate that the instrumented front bumper does an admirable
job at keeping the robot from getting into trouble from large
obstacles encountered in a real world situation. When the sonar
is added, the bumper will be the fall back system in case the
sonar does not detect an object. Here are the details.
Don't forget to
view the MPG movie at the end, you can see Geobot in action!
|
Click on the thumbnails for a 2x larger view 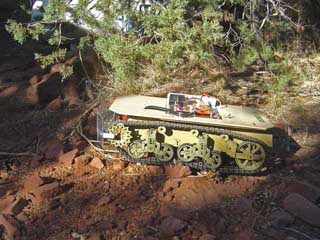 | The
dual tread system has just enough tension to drive reliably,
yet can conform to large rocks and branches. |
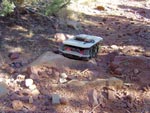
| You
can get a feel for the extreme terrain we put this robot through.
The bumper height is set such that if it cannot climb over a
rock the bumper will be triggered and the robot goes into an
escape maneuver to drive around the rock. Later, sonar will take
over this task. | 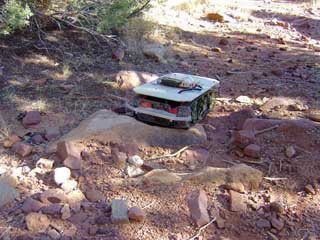 |
 | Because
the tread conformed to the rock surface, good traction was maintained
in such difficult conditions. It became apparent that an inclinometer
would be a good addition later, in that we don't want to tip
over or try to go up too steep of an incline. |
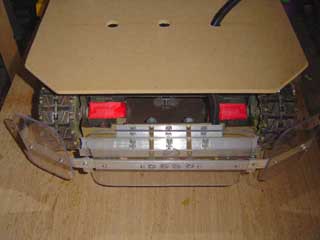
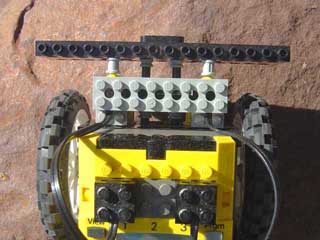
| Now
for some details on the bumper. Its best to remember that you
build the bumper first - THEN instrument it with switches. This
way you don't get into the mind set of the switches dictating
the bumpers design, which is usually doomed to failure. Here
you can see the 1/8 aluminum bar with the lexan plates mounted
on it to increase the coverage. The bumper sits 2 inches below
and 3 inches above. Anything below the bottom of the bumper can
be driven over for the most part. | 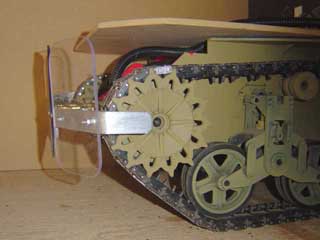 |
 | Front
view showing the three lexan panels mounted on the aluminum frame. |
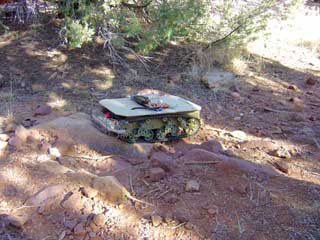
| The
ground clearance of the Geobot is very good, well over 4 inches.
The bumper plates are in front of the treads and in the middle. | 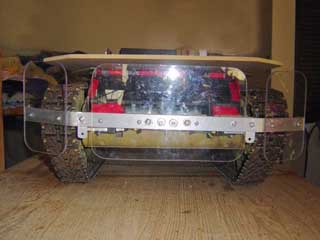 |
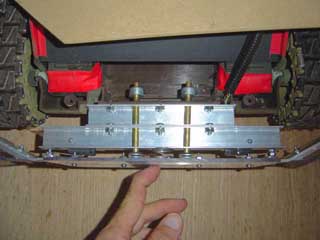 | How
the bumper works, some details. A weak spring pushes the bumper
bar outward and it is attached to the two brass rods. These slide
in and out of the U channel forming a slide. However, one difference
- the attachment point of the rods to the front bumper is flexible,
made from rubber encased steel washers at the joint. Pushing
in the center, pushes both rods in and closes both switches. |
| Pushing
on one side makes the rods move inward differentially, and closes
the left side switch only. This type of bumper arrangement, which
can be described as a dual spring loaded plunger type is very
robust, and can take an extreme beating without harm. There are
limit screws on the bumper to keep the bumper compression limited
as to not crush the lever switches. | 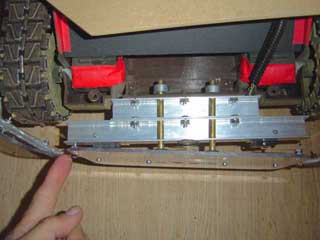 |
 | The
final prototype for our dual plunger design was developed over
several months using Lego technology. This prototype design is
in a dual skid drive robot we eventually named "SkidBot"
because of its weird turning action. You can see more on this
robot Here. |
 1.5Mb mpg Video
| finally,
a small movie clip with sound showing a 75 foot excursion through
some very rough rocks and weeds to show how it works without
any sonar yet. Unfortunately, and airplane was flying over during
the run! |
HOME
You are visitor
number since June 17, 2001

FastCounter
by bCentral