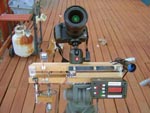
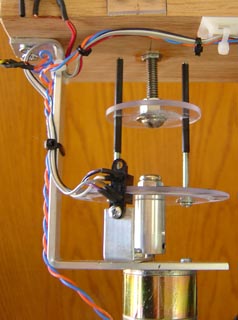
Introduction Here is the DSLR version of the tremendously successful film based Auroracam 1, which for years has enabled us to capture Arizona aurora, meteors, airglow and full sky images both manually and automatically. This version is the most sophisticated yet, and two were constructed at the same time with direct interfaces to the Canon XTi DSLR for automatic imaging, tracking and rewind functions. It is not your typical barn door mount! It is controlled by two 10mhz microcontrollers mounted on a box on its side, micro switches on the two boards themselves, and RESETS at the end of the exposure - no matter what the length is up to 10 minutes, during the period when the image is downloaded for the next shot by the Aurora Cam, which is a autonomous robotic device itself. The resulting images are of tiny pinpoint stars moving through the same piece of sky all night long. The ground is trailed a bit, but the stars are not. 10 minutes is the perfect exposure for our very dim aurora when it occurs, and is about right for deep Milkyway imaging in either hemisphere. Applications This whole project started because of our desire to record the more common photographic aurora visible about half a dozen times a year from Arizona. With the proton flux (Kp value) up, you never knew what hours of the night the flux would peak, and you had to be ready at that moment to catch an exposure of the fleeting event. Staying up all night on promising but not in anyway guaranteed high Kp nights during the middle of the week was not enticing or feasible. The solution was of course the robotic Aurora Cam, detailed elsewhere on this site. The next step to make the images even more photogenic (star trails get old after a few hundred of them) was to have the camera track on the same piece of sky, and put that aurora, meteor or satellite against a much more natural background. With that in mind, applications now included all night patrols for meteor showers, even the weak ones, a complete night of sky rotation during different parts of the year with the fish eye lens, and shooting constellations going through the field all night long with a moderate focal length. How many shots do you have of Grus? or perhaps Columba? While I sleep or do other observing activities such as prime focus imaging, I can now have these hard to get shots I could only wish for before. Design Goals Optically, the limits for the projects included a 8mm f/3.5 fish eye, and a 17 - 40mm wide angle zoom lens. For the same piece of sky, a maximum of 10 minutes was selected to simplify and maintain accuracy in an inexpensive and robust design. Fulfilling this need was a scotch mount, but its drive section had to be resetable to start in between exposures and start tracking immediately upon start of the exposure. Electronics had to run on 12vdc, and draw a low current as to run off a small battery in the field all night long. The scotch mount itself will have a standard camera ball joint on top, so I can also use it as a standalone tracker for a camera operated manually. How it works electrically First a brief description for the electronics challenged people out there. Then Ill go into more details from an electrical engineering point of view. Basic description: The concept behind a barn door (Scotch) mount is to drive a 1/4-20 screw at 11.43 inches from the hinge at exactly 1 RPM to achieve sidereal rate. At least for a limited range of about 10 minutes. After that, huge errors start creeping in. Any camera put on top of the upper board in theory will give nice round stars, instead of star trails. My drive works in the following way, an electrical circuit in a box on the side of the unit turns on the motor that drives the jack screw at an average of 1 RPM by pulsing it every 2.5 seconds. It rotates about 1/24 a circle every 2.5 seconds, thus in 1 minute, it goes around 1 time. So there we get the 1 RPM we need for good tracking. The circuit also resets the tracker to start at the end of the exposure by reversing the motor for about 35 seconds. The tracker will only start tracking again once the shutter is closed. 2.5 seconds may seem a long time to drift before making a motor correction, but it only amounts to half an arc minute, about 1/20 the size of the globular M13. So it isn't resolved in even the 40mm lens.
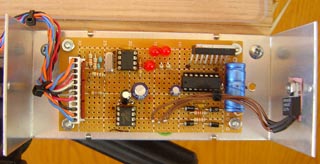
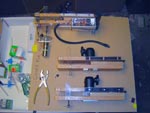
Engineering Description: Twin PIC microcontrollers and an L298 dual H bridge motor driver are used to actuate the motor and sense the lever switches. The first PIC, has a very simple task in life - it puts out the rising edge of a square wave every 5.000 seconds, set by software. This PIC, an 12F629 has its own 10 MHz Xtal, so it is deadly accurate. The reason for having this is because any microcontroller cant do more than one thing at a time, and we cant control the motors and examine the sensors without affecting the exactness of the time reference. So for a buk a processor, its very cost effective to use one for time pulses, and the other for the automation.
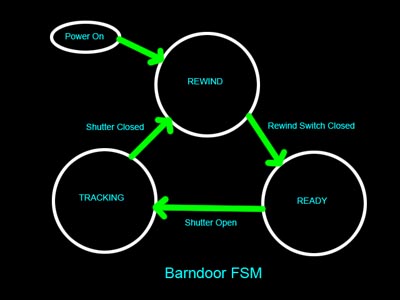
The second processor has the following input: The lower limit switch, and the photo interrupter used in the optical shaft encoder. This processor is also a 12F629, but does not need to be accurate so we use the internal RC 4 MHz oscillator. The programming is a tri-state Finite State Machine. There are three states: Ready, Track, and Rewind. We upon power up, move into the Rewind state, which checks the rewind switch. it turns on the motor in reverse at full speed until the switch is closed. Then it jumps state to the Ready State. This state constantly scans the shutter lever switch for closure. If no closure, the motor is idle. As soon as the shutter switch is closed, we jump state again to the Track State. here we have a loop that examines the shutter switch, and if closed then advances the motor forward until it sees the next black segment on the wheel. It uses the precise 2.5 second pulses from the first controller to time its advances. If the shutter is closed, the switch opens and we jump state to the Rewind State again. And the process repeats. This way, no matter what the exposure time, the system always works. You just have to allow about 1 minute between exposures (which I always did anyway) to rewind, which after a 10 minute shot takes 35 seconds. For manual use as a normal barn door, a standard toggle switch is connected into the shutter switch cable so It can be used without the Aurora Cam.
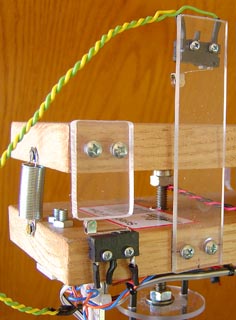
Calibration After beginning sky tests with the twin barn doors, it became very apparent I needed to calibrate the units. First, the finder scope used to aim at the pole was not correctly aiming at the center of rotation even if it laid right on the bolt of the door hinge. Second, the rate was not exactly correct from not getting the drive bolt at exactly 11.43 inches. A tube was installed near the hinge on both, and adjustment screws allowed the internal finder to be set to a precise sky location around the rotational axis. By tilting the barn door open and closed, a distant object would be seen rotating - the center of the rotational axis. I then aimed the finders cross hairs at this point. For the speed calibration, the timing of the 2.5 second processor was adjusted in millisecond increments such that a laser beam mounted on the top of the board would be driven exactly 5.254 inches in 10 minutes when the hinge was exactly 10 feet from the wall. This worked extremely well and it produced very small round star images in actual sky tests. Photo Gallery Click on thumbnails below for the larger 1024 x 768 size
|
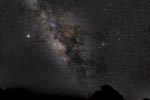
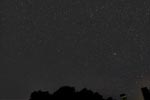
 (Actual Auroracam Image)(
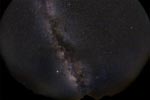
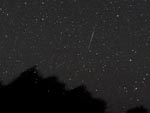